

Can You Upload Apple Prores 422 To Youtube
Codecs don't need to exist hard. No, really, they don't. All that matters is that you lot cull the right codec.
By the end of this article, yous will be able to pick the best codec for you on each project. My goal is to give you what you demand to make your own informed decisions about codecs. And so yous tin can choose the correct codec for yourself, instead of relying on what worked for someone else.
I'm going to walk you through every step in the process of making a video. Click on a heading to jump to that section. I'll cover:
- The codec yous shoot
- The codec yous edit
- The codec you color-right
- The codec you transport to VFX
- The codec you consign
- The codec you archive
At each stage, I'll explicate which factors you should be considering equally you choose a codec. I'll also give yous some examples of the almost commonly-used codecs for that phase.
Forth the fashion, nosotros'll cover why depression-end codecs and high-end codecs can each slow down your editing, the reasons for a proxy/offline edit, a real-world project walkthrough, some storage-saving strategies, and an explanation for why transcoding cannot meliorate your image quality.
The benefits of optimizing your codecs can be huge. Cull the right codec and you'll preserve your images in the highest quality. Information technology tin too make your work faster, and lets you take the all-time advantage of your calculator and storage. You'll exist able to work faster on a laptop than many can on a high-end belfry.
What a Codec Does
A codec is a method for making video files smaller, usually by advisedly throwing away data that nosotros probably don't really need. And they're pretty smart almost how they do that. A few years ago, I created a video that covers the main compression techniques that many codecs use. Information technology's not required viewing to understand this commodity, just it certainly won't hurt.
How Codecs Piece of work – Tutorial.
If you're skipping the video, here are some very basic explanations:
- Chroma subsampling:Throws abroad some color data (4:4:4 is no chroma sampling. 4:2:ii is some chroma subsampling.4:2:0 is lots of chroma subsampling). Bad if you lot're doing color-correction. Really bad if you lot're doing green screen or VFX work.
- Macro-Blocking:Finds blocks (varying size) of like colors and makes them notwithstanding color. Bad for VFX and color-correction. About all codecs utilize this to some caste, and the amount tends to vary with the bitrate.
- Temporal pinch:Uses previous frames (and sometimes post-obit frames) to calculate the electric current frame. Bad for editing.
- Bit depth:The number of possible colors. Deeper fleck-depth (larger numbers) is good for colour-correction and VFX.
Codec Comparison Table
I've also pulled together a list of all of the most common codecs used in the postproduction world. This list can help you compare dissimilar codecs against each other and brand the best decision for your project.
In that location are many different codecs that tin can be used in the editing procedure. The ones I've included are past far the most common. There is a meaning reward to using popular codecs. They are more likely to work on your organisation, your client's organization, your system-in-five-years, etc. And information technology's easier to find help if something goes wrong.
Open the table in a new tab. That fashion you can compare codecs every bit you lot read through the article.

Check out the table
Lossyness
One of the columns in the table is "lossyness," which is an important concept with codecs. When I'1000 talking almost lossyness, I don't necessarily mean what your center sees. I hateful the corporeality of data that is retained by the codec, simply some of which you can see. The question is: If I had an uncompressed paradigm, then I compressed it with this codec, how similar would the new image be to the old image? How much data is lost in the transcode? If the two images are very similar, then the codec is not very lossy. And if they're pretty unlike, then it's more lossy.
The lossyness is a combination of the techniques that the particular codec uses and its bitrate. A more lossy codec is not necessarily bad. In some cases (when viewing online, for case), it's really not necessary to retain 100% of the original paradigm. Using a more lossy codec can be a really smart move because of how much space it saves.
If the image looks only as good to my centre, then why should I care if it's technically 'lossy'?
You should care because you may want to change the paradigm. If y'all are doing whatever sort of color correction, then you will be changing the image. The result might be that you run across elements of the image that weren't visible (or prominent) when y'all captured it.
For example here is an image that was captured raw.

Here is a screengrab of it compressed with H.264, using a standard YouTube-recommended settings.

So compressed with DNxHD 350x:

They all look pretty much the same, don't they? The visual quality is about the same, and the H.264 file is a fraction of the size of the DNxHD file. This is why it'southward the recommended setting for YouTube. It looks just about as good to the eye, and the file is much easier to upload to the internet.
The trouble with the H.264 version, however, comes when you effort to make changes to the prototype. What if yous wanted to increase the exposure?


Now we tin can see where the highly-compressed image falls autonomously. Her pilus and shirt look terrible in the h.264 image, and the buildings by the river look all mushy.


This is why y'all really want a high-quality codec when you capture the image. Because you will probably desire to brand changes later on, but y'all don't know yet what those changes might be. You'll want to tweak the color and contrast, peradventure tweak the speed, possibly add some VFX. A highly-compressed file doesn't allow for those changes without breaking down.
This is why information technology'south a skillful idea to capture your footage in x-bit fifty-fifty if you may exist outputting an 8-bit file in the end. Y'all don't know, when yous shoot, which bits y'all're going to want.
The Codec Journey

Now it's time to walk through the different stages that you'll encounter in each project.
Every project starts with a codec that you capture in the camera. And ends with a codec you lot consign (delivery codec) and manus to your client or upload to the web. In the simplest case, you do all of your editing and color-correction right on the camera files. And so you export to your commitment codec, and then you're but ever using two codecs.
But most of the time it gets a little bit more than complicated. Y'all might transcode to a different codec for editing, and potentially for color-correction, and definitely for VFX. Merely information technology all starts with…

The Codec Y'all Shoot With
(back to the alphabetize)
This is your capture codec, (also called the "camera native codec" or "conquering codec").
Generally speaking, you should aim for the highest-quality codec that your camera (or your budget) can capture. When I say "highest quality", I hateful that you desire to capture as much information as possible. So you lot desire less-lossy codecs: less pinch, higher bit-depth, and less chroma subsampling. The more data y'all have when you capture, the more flexibility yous volition take later. Especially in color-correction and VFX (if you're doing that).
Of form, you too have to consider a lot of other, practical factors in this decision. Otherwise nosotros would always be shooting 8K raw, right?
Price
The first consideration is plain cost. By and large speaking, the more than expensive the photographic camera, the higher quality codecs are available on information technology. I say generally because there are some "sugariness spot" cameras that tin offering excellent codecs at a reasonable toll. Panasonic's GH series (especially in the early days when the GH2 was hacked) was known for offering better codecs than the other cameras in its price range.
Tip: Meliorate Codecs with External Recorders
One way to capture college-quality codecs on cheaper cameras is to use an external recorder.
These devices (many of which can double every bit external monitors) take an uncompressed signal from the photographic camera, via HDMI or SDI, and compress it separately. So you cease up with two copies of your footage. One copy heavily compressed on the camera, and a second copy lightly compressed on the external recorder. The key thing here is that the camera sends the signal out to the recorder before compressing it.
I important note here is that many cheaper cameras merely output eight-bit, and frequently not in iv:4:4. An external recorder might be able to compress to a 12-bit codec. But if the camera is only sending 8 bits, the recorder can simply record eight bits. Some cheaper cameras may also not output a "clean" HDMI signal that is suitable for recording. We call an output indicate "clean" when information technology'southward just the pure image with no photographic camera interface overlays.
Storage
The second cistron to consider is storage space. High-quality codecs tend to be higher bit-rate, which means that the files are larger. Y'all need to exist prepared to store and support all of those files as y'all're shooting. And yous may also have to upgrade your retentivity cards in guild to exist able to record the high-bitrate data. If you're shooting solo, then you may terminate up choosing a lower-quality codec because it allows you lot to change retention cards less often.
Finishing
Another factor to consider is how much color-correction and VFX (collectively referred to as finishing) you programme to do. If you're going to be doing very minimal color-correction and no VFX, then you can probably get away with lower chip-depth, chroma subsampling, and macro blocking that come with lower quality capture codecs.
Editing Hardware
The terminal factor to consider is your editing machine. Nigh capture codecs are not well suited to editing without a high-performance computer. H.264 and some raw files require a powerful CPU/GPU to edit smoothly. And very-loftier-bitrate codecs may require high-speed hard drives or information servers. Unless you're shooting an edit-friendly codec, you may have to transcode your files to some other codec before editing. And this can have fourth dimension. For some, transcoding the footage isn't a huge outcome considering it can be done overnight or on a spare computer. If you're working on very tight turn-around times, however, you may choose a codec that will allow you to beginning editing immediately after a shoot, even if that means a higher cost or a sacrifice in epitome quality. I explicate which codecs are all-time for editing in the adjacent section.

The Codec You Edit With
(dorsum to the index)
Alright, you've shot your flick, and you've got all of your files onto your computer. Now y'all need to decide whether you're going to edit with these files. Or whether y'all want to transcode into another format.
Why should I transcode before editing? Tin't I just edit the files that came out of the camera?
Well, information technology depends. Pretty much all of the major software packages can now edit any codec that your camera creates. (Unless you're a badass shooting on a brand-new camera with brand-new technology). But while it's nigh e'er possible to edit the codecs that your camera shot, it's not e'er the best idea.
If yous're lucky plenty to exist shooting on a codec that is great for editing, yous tin skip this step.
For many of the states, however, the capture codec isn't going to be optimized for editing. There are two main factors y'all need to consider when choosing your edit codec: compression type and bit rate.
Highly-Compressed codecs can Slow Down Your Editing
(back to the index)
Most lower to mid-range cameras record with codecs that use temporal compression, also known equally long-GOP compression. I will give yous a simple explanation here, but if you're interested in learning in more detail, check out my codecs video, starting at 19:00.
The elementary explanation of a long-GOP is that, for each frame, the codec just captures what has changed betwixt this frame and the previous frame. If the video doesn't include a lot of motility, then the new file can exist a LOT smaller. The departure between this frame and the last frame is merely a few pixels. So all yous demand to store is a few pixels. That'due south corking!
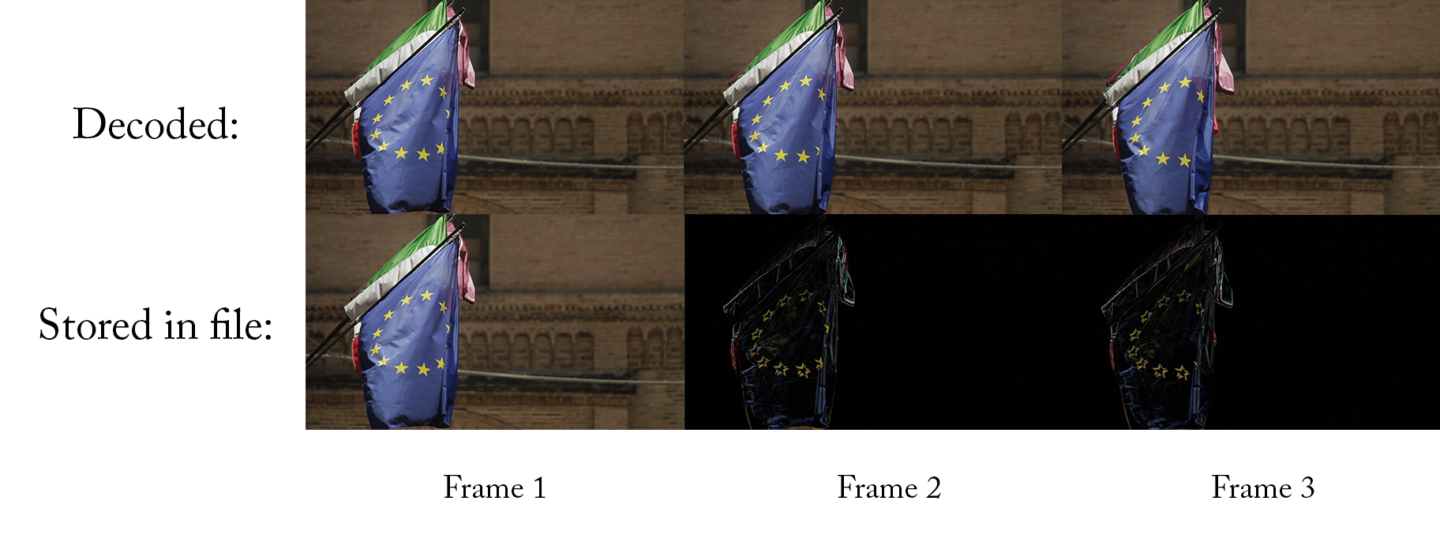
Always frontward
The issue, even so, is that these codecs tend only to piece of work well when played forward. (If you lot're curious why, take a look at the video). That'south great for viewing on YouTube and your DVD player, merely it's non corking for editing. When you're editing you're often jumping around, or playing a clip backward. And tt takes a lot more than processing power to do those things quickly with a long-GOP codec. A loftier-terminate computer might have no problem, simply even a mid-range computer will lag and stutter when y'all skim through the footage quickly or jump around.
Codecs that aren't long-GOP (a.k.a. intra-frame codecs), can play backwards just every bit easily as forwards. So even a mid-range figurer can skip around very smoothly. If you lot've but ever edited clips straight from the camera, you non might realize what you lot're missing!
The other affair that can cause issues with playback is raw video. Raw video needs to be converted before information technology can be displayed (sort of like a codec does). And some computers can't decode the raw file fast enough, especially if it's 4K. Ironically, both the low-end cameras and the highest-end cameras produce files that are hard to edit!
Loftier-Bitrate codecs can Wearisome Downwardly Your Editing
(back to the index)
For low to mid-range codecs, you don't have to worry about the bitrates at all. Once y'all start moving up the ladder, however, high bitrate codecs can cause issues with editing, particularly if you're working on everyday computers.
The reason is because your computer needs to exist able to read the data from your hard drive at a bitrate that is at least equally high as your codec'south bitrate. It makes sense — if your codec is 50Mb/south (fifty megabits per 2d), and then your computer needs to be able to read that file from your hard drive at 50Mb/s or else it'll fall backside and stutter.
(notation that Mb/s stands for megabits per second, while MB/s stands for megabytes for second. At that place are eight bits in a byte, and then you need to multiple past 8 when converting from MB/southward to Mb/s)
Some skilful news
The good news is that difficult drives are getting faster every mean solar day. Then 50Mb/southward is never going to cause any problems. Only what if yous're editing ProRes 422HQ at 4K, which is 734Mb/s? The average external hard drive is only only barely fast enough to play that dorsum. Some cheaper hard drives won't manage information technology at all. And then, what if you're editing a multicam with 3 cameras? Suddenly yous need 3x that data rate: 2,202Mb/s! At that bespeak, you're going to need to invest in some high-operation hard drives or RAIDs.
Here are some rough guidelines for mutual data storage speeds. (There will always be certain models that underperform or overperform.)
- Standard spinning bulldoze: 100-120MB/s
- Professional spinning drive: 150-200MB/due south
- Standard SSD: 400-500 MB/s
- Depression-end RAID: 200-300 MB/s
- High-terminate RAID: 1000-2000 MB/s
Shooting in log tin tiresome down your editing
Shooting in log is a mode of preserving as much of your dynamic range as possible. This allows a scene that has bright highlights and dark shadows without blowing out the highlights or crushing the blacks. Blown-out highlights are a particularly nasty side-upshot of shooting on video instead of film. And then shooting in log can help brand your footage feel more cinematic. Now that log profiles are available even on nearly prosumer cameras, information technology'southward an extremely popular way to piece of work.

The downside
The downside is that the prototype that comes out of the camera doesn't expect and then neat. You'll demand to add contrast and saturation in order to get even close to the concluding image. The most common way to practise that is to add a LUT to your footage. This is essentially a unproblematic preset color correction that brings your footage back to a "normal" wait.

If you're shooting in a log colour space, so you need to apply a LUT to your footage in order to preview it with normal color and contrast. This ways that your editor will need to utilise the advisable LUT to all of the clips when editing. This tin can exist annoying to manage, and it can also deadening downwardly the computer a chip. This is because it needs to beginning decode each frame and so apply the LUT before displaying it. It's certainly possible to edit the log footage without any LUT, but it'due south not ideal. The colour of two shots may influence how you intercut them.
If yous're going to transcode your files before editing them, then y'all tin utilise the LUT during the transcode process. That style, the editor is always working with footage that has good contrast and color and never has to bother with LUTs. Notation that you lot should only practise this if you are using a Proxy workflow, non a Direct Intermediate workflow (described below).
Consider time spent encoding
The main downside of transcoding your footage before editing is simply the time it takes to do the transcode. If you have a lot of footage to go through, and your figurer isn't fast, it may take a long time. If you're not in a big hurry, you tin can allow the transcode run overnight, potentially on multiple computers if you lot have access to them, but that'south not always ideal.
When I worked at Khan Academy, our founder would regularly record short video messages to ship out to people. Who were often on very tight schedules. I would usually shoot in 4K in a long-GOP log format, and edit them on a MacBook Pro. Editing 4K long-GOP with a LUT (to correct for the log footage) on a laptop would mean I could play the video back simply fine in Premiere Pro, but I couldn't zoom effectually the timeline as fast every bit I wanted without stuttering.
But that didn't bother me too much because the edit was extremely simple. Just a few cuts, maybe some music, a championship, and I was done. Even though my editing speed wasn't ideal, I would take spent more than time in the transcode than I would take saved in editing speed, so I just used the original files.
If I were editing a longer slice with the aforementioned setup, however, I would transcode to DNxHD or ProRes. Generally, I would do nearly of the transcoding overnight, often with multiple machines running at the same time.
Proxy Edit
(back to the alphabetize)
If yous're going to transcode the native camera files before y'all edit them, and then you'll use an "intermediate" codec. It's called intermediate because it comes between the capture codec and the export codec. There are two mutual ways of working with intermediate codecs:
The beginning is the "proxy" workflow or "offline edit." This means that y'all are transcoding your captured footage into an intermediate format, editing with that format, and then re-linking dorsum to the original photographic camera files before exporting. Because you volition use the camera files to consign and not the proxy files, y'all don't need to worry and then much nearly picking a proxy codec with neat image quality – lossy codecs are fine. You lot can optimize for editing speed and storage convenience instead.
The proxy workflow is and then common that many loftier-end cameras record a loftier-end raw file *and* a ProRes or DNxHD proxy file at the same time. After the shoot, the raw files are backed upwardly and put in storage. The proxy files are sent off to the editors and to the director/producers for dailies.
Avoid temporal compression
When choosing a proxy codec, you desire to go for ane that does non use temporal compression (aka inter-frame compression or long-GOP pinch), and you desire to option one that has a lower bitrate. The low bitrate means that the files are much smaller, so you can use fewer/smaller/cheaper hard drives, simplifying your workflow. Woot!
While the proxy files are great for editing, yous shouldn't exercise more than basic color-correction with proxy files. If you are going to practise all of your color-correction inside of your editing software, then it's best to re-link back to your camera files because your proxy files may have lower colour quality.
The good news is that most editing software today can switch between the camera files and the proxy files in but a couple clicks, and so you lot can even go dorsum and along if you need to.
We've published detailed guides for proxy workflows in each of the major NLEs:
- Last Cut Pro X Proxy Workflows
- Premiere Pro Proxy Workflows
- Gorging Media Composer Proxy Workflows
Some good choices for proxy codecs
Past far the most mutual proxy codecs are DNxHD/DNxHR and ProRes. They have both been around for years, so they're very widely supported. Everyone knows how to handle them. They are both very well suited to a proxy workflow (ProRes fifty-fifty has a preset chosen "proxy"), and are nearly interchangeable when used for proxies.
DNxHD is made by Avid, and ProRes is made by Apple. Then it makes sense that DNxHD would work amend on Media Composer and ProRes would work meliorate on Last Cut Pro X. That used to certainly be truthful, just present both codecs work very smoothly on all modern editors (including Premiere Pro). There may be a slight speed increment in using the codec that was designed for the organization, but it's very slight.
The just meaning difference between the two for a proxy workflow is the fact that yous may have trouble creating ProRes on a PC, while DNxHD is very easy to create cross-platform. The only officially-supported manner to create ProRes on a PC is with Digest Scratch. At that place are some other unsupported methods for creating ProRes files on a PC, but they're not always reliable. PCs tin can hands play dorsum and edit ProRes files, but yous can't encode new ProRes files on a PC equally hands as DNxHD, and so some editors adopt a DNxHD workflow for that reason.
Pick a lane
Regardless of which of the 2 codecs you pick, you lot besides take to option which flavour you desire. This is really going to depend on your storage constraints – it's a tradeoff between image quality and file size. The good news is that you don't demand tip-superlative image quality when you're editing, so you can cull a depression-bitrate codec.
Start off with the smallest ProRes or DNx codec in the same resolution as your capture codec. Look at the GB/hr column and multiply it by the number of hours of footage you have. If you have enough storage space, then you're good – utilize that codec. If you take lots of extra storage space, think virtually using the next largest season.
But if y'all don't have enough storage infinite, or if you're on an underpowered machine, and so take the resolution downwardly a notch. A lot of huge-budget Hollywood films were edited in 480p just a few years agone, so don't sweat it if yous need to lower your resolution from 4K downwardly to 720P for the edit.
Direct Intermediate
The other type of intermediate workflow is something that I'm calling Direct Intermediate. This ways that you transcode your camera files into a codec that is both good for editing and very high-quality (not very lossy). Because the codec is very high quality, almost all of the original information from the camera files has been preserved, and then it's not necessary to re-link back to the camera files – you lot tin just export straight from the intermediate files. In that location will be some theoretical loss of data when you transcode, but if you pick a good enough intermediate codec, information technology'll be small-scale enough that you lot don't demand to worry about it.
(Notation: I'm calling this process "Direct Intermediate" because at that place isn't a common name for this workflow. People ordinarily just call this "intermediate," but that tin can exist disruptive because proxy workflows are also a kind of intermediate workflow. Some people volition also call this an "online" workflow, but this is also disruptive because that term was created to describe a workflow that includes an offline and an online edit, not a workflow that's online from kickoff to finish.)
Preservation is key
The fundamental to picking a good Direct Intermediate codec is to make certain that you are preserving all of the information from your capture codec. An intermediate codec volition never make your images amend (more detailed explanation below), but it can definitely brand them worse if you cull the wrong codec. The important thing is to empathise the details of your original footage and make sure that your intermediate codec is at least equally adept equally your capture codec in each surface area. If you capture your footage on a DSLR like a Sony A7Sii at 4K, then you volition be recording in a 4:2:0, viii-bit, Long-GOP codec at 100Mbps. Yous want an intermediate codec that is at least iv:2:0 and 8-bit. Going beyond these values (e.g. to four:4:four and 12-bit) won't hurt, merely it also won't help at all. So it's probably not worth the actress storage space.
Let'due south say, for case, that we want to go with a ProRes codec. Nosotros have 4 options to choose from that are four:2:2 and x-fleck.
- 145Mb/s ProRes 422 Proxy
- 328Mb/south ProRes 422 LT
- 471Mb/south ProRes 422
- 707Mb/s ProRes 422 HQ
Over and above
Y'all might think that all y'all demand is to match the camera bitrate (100Mbps), just y'all actually need to profoundly exceed the camera bitrate. This is because h.264 is a much more efficient codec than ProRes. Because h.264 uses long-GOP compression, information technology can pack a lot more information into those 100 megabits than ProRes can. In gild for ProRes to match the image quality of h.264, you demand a much college bitrate. I would recommend only using ProRes 422 or ProRes 422 HQ if you're starting with a 100Mbps h.264 codec. ProRes 422 will probably do just fine, but if you have lots of storage space, then going up to ProRes 422 HQ will take a slight edge.
While it's fine to simply match the bit-depth and colour sampling when choosing an intermediate, you should always increase the bitrate at least a little. If you're going from long-GOP to a non-long GOP codec, then you should increase the bitrate a lot.
Side notation: If yous wanted to go with DNxHD instead of ProRes, yous accept similar options, except that DNxHD besides offers an 8-chip version for the lower-end codecs. Since our footage is 8-fleck to start with, that won't injure the states at all.
The proxy workflow sounded pretty practiced. Why do the Direct Intermediate?
Role of the reason why the Direct Intermediate workflow is common is because information technology used to be a lot harder to use a proxy workflow. Some of the major software providers didn't make it particularly easy to relink back to the original camera files, and so people would choose a straight intermediate workflow. Nowadays, however, it'south pretty easy to do in any editing parcel. The primary exception is when you lot accept a lot of mixed footage types. If you take multiple frame rates and frame sizes in the same projection, switching back and forth from the proxies to the capture codecs tin be a headache.
If you are using some tertiary-party tools to help prep and organize your footage before you start cutting, those can also brand the relinking process more than catchy. 1 mutual example might be software that automatically syncs audio tracks or multicam shoots.
No swapping required
Some other reason why y'all might want to use a Direct Intermediate workflow is because you can motility right on to colour-correction and VFX ("finishing") process without swapping around any files. Keep reading, and I'll explain more about why that's convenient in the Color-Correction and VFX sections.
1 downside, nevertheless, is that you can't "bake in" the LUTs for your editor – you're going to need to apply a LUT via a color-correction effect in your editing software. If you were to include the LUT in your transcode for Directly Intermediate workflow, you would exist losing all of the benefits of recording in log in the kickoff place.
The other obvious downside is that you need to store all of these (much larger) files.
An intermediate codec volition never brand your images better
(back to the alphabetize)
This is very of import, considering it is very unremarkably misunderstood, and there is a lot of misinformation online. Transcoding your footage earlier you edit will never increase the quality of the output. In that location are some actress operations that y'all could do in the transcode procedure (such as using sophisticated up-res tools) that could increase the image quality in some cases, but a new codec by itself will never increase the quality of your image.
If y'all cull the right codec, you can avoid hurting your image, only you can never better it.
That includes going from h.264 to DNxHD or ProRes. It also includes going from 8-chip to 10-bit. And going from 4:ii:0 to 4:4:iv.
Hither is an illustration that tin help you understand this concept:
This is a photo of a rose reflected in a water droplet. It's 4 megapixels, and it looks pretty nice on my 27-inch monitor.

Now what if I take a photo of my monitor with a Ruddy Helium 8k photographic camera. This is a beast of a photographic camera. I shot the photo of the rose a few years ago with a cheapo Catechism Rebel DSLR, worth about $250 today. The Red Helium setup costs about $50,000, information technology'due south 35 megapixels, it's raw, it has ane of the best photographic camera sensors always produced.

Which will be a ameliorate image – the 4 megapixel photo, or the 35 megapixel photograph?
A capture of a capture
The Cherry-red camera has more megapixels, right? Information technology's raw, and information technology has all of the Red digital magic, right? Simply since I'm using my high-resolution photographic camera to take a photo of the photo, non a photo of the rose, my fancy new image will never exist improve than the get-go ane. I accept a file that is technically college-resolution, but it does non capture any more of my subject (the rose) than the kickoff one did.
This is what you lot're doing when yous're transcoding. You are making a re-create of a copy, taking a photo of a photo. If y'all apply a fancy high resolution camera to accept a photo of a photo, you will be able to preserve pretty much all of the information in the original image, but you won't be able to add anything more.
The big caveat is that, if you are doing any processing, any transformation of the image (calculation a LUT, for instance), then you definitely practise want to transcode into a college-quality codec, which will retain new information. But if you're not altering the image, then transcoding will not make your image somehow "ameliorate."
A Real-Globe Example
(back to the index)
Allow's say yous're editing a documentary that captured 4K footage using a Sony A7sii camera, recording in the long-GOP version of XAVC-S. Not ideal for editing. If they shot 40 hours of footage for your feature-length documentary, y'all'd end up with about 2.7TB of photographic camera files, which tin fit on ane hard drive easily (though y'all've made other, separate backups, of course!).
You could convert that to a high-quality, not-very-lossy codec for a Straight Intermediate workflow, maybe ProRes 422 HQ in 4K.
The downside is that you would need nearly 12.7TB in lodge to shop that all of those ProRes files. You lot would have to use an expensive RAID setup in order to have piece of cake access to all of that footage in one project, at least $i,000. Peanuts for a big facility, only a significant investment for a solo editor.
Choosing proxy
So yous might decide to utilise a Proxy workflow instead and transcode your files to the ProRes 422 Proxy 4K format. And then your footage would but take upward 2.8TB, only barely more than your captured footage. Y'all can so easily edit off of a unmarried hard drive, and your workflow gets a lot simpler. (For instructions on how to calculate bitrates and file sizes, check out this article: The Simple Formula to Calculate Video Bitrates).
Permit'south say that you're working with another editor who's on the other side of the country. You might decide to transcode the footage even further down to ProRes 422 Proxy Hard disk, which would shrink your footage down to just 640GB, which becomes more viable to transport over the Cyberspace if you accept a fast connection. (18hrs to download on an 80Mbps connexion)
When the edit is all washed, you just re-link your project back to the original photographic camera files and export. Even though you and your remote editor have been working in a pretty lossy codec, the final export bypasses it, so yous don't lose any quality.

The Codec you Color-Correct
(dorsum to the index)
Ok, now y'all've got your video edited, and it'due south fourth dimension for color-correction. Everything we're talking about hither will apply whether y'all are color-correcting inside your editing awarding, or whether you are sending your edit to dedicated color-correction software.
The big question at this signal is whether y'all want to color-right direct on the original camera files, or whether you lot want to transcode. If you did a proxy/offline edit, then you lot definitely don't desire to color-correct the proxy files, because they have a lower image quality. In gild to brand practiced decisions near color, you lot need the highest quality image that you accept available, considering yous need to be able to see exactly what yous have to work with.
And then we need to work with high-quality images, and we take a few different options:
A. Course the photographic camera files
This is certainly a unproblematic option. If you did a proxy edit, y'all can relink to the camera files for the finishing process and go to boondocks. This will give you lot maximum image quality, merely remember how the camera files can be slow to piece of work with? The camera files may boring down the procedure a little, just depending on the software you utilize and the amount of work you demand to do, you lot might decide that the simplicity is worth a footling fleck of potential slowdown. If you have a brusk edit without a lot of complexity, then this can be a great and easy workflow.
Let's assume that the color-correction deadening-downward bothers you, and so you need a codec that is easier to piece of work with. You could transcode all of your footage to a high-epitome-quality codec, link to those files, and so start doing your color-correction. But… that kind of defeats the purpose of a proxy workflow, doesn't information technology? We used proxies because we didn't want to have to deal with the large files that would create. Fortunately, there is another option.
B. Consolidate and Transcode
(dorsum to the index)
If you used a proxy/offline workflow for the edit just don't desire to colour-correct the photographic camera files, 1 good option is to relink to the camera files, consolidate your projection and and then transcode to a high-cease codec.
When you consolidate a project, your editing software will make a re-create of your project along with a copy of the media, but only the particular files that you concluded upward using in your sequence. And then if you shot 7 takes but only used one of them in the edit, information technology'll just copy that one take. This cuts downwardly on the storage a lot, which comes in handy at this stage. You can also consolidate down fifty-fifty further and so that you only keep the specific portions of each take that you lot actually used in the edit, discarding the residue. In this case, the software volition usually include a few seconds before and afterwards each take (chosen "handles"), in case you lot want to add a fade or movement tracking.
Beginning your grade
At present y'all can take this new consolidated projection (later relinking to the originals) and transcode all of these files to a very high-quality, high-bitrate codec, and start color-correcting. This is different from the Directly Intermediate workflow considering yous are not transcoding all of your footage – just the footage that fabricated it into the final edit, which might be i/20th or 1/50th the length of the footage that you lot originally shot. At present it doesn't sound so bad to transcode to a high-bitrate codec considering you don't have to shop and then much of it. Even at ProRes 4444 4K, a full-length feature picture will only be about 2TB – pretty manageable.
Now yous can finish your movie with acme-quality images and speedy processing, on a hard drive that fits in your pocket. Woot!
C. Behave on the Straight Intermediate
The tertiary selection is to go with the Straight Intermediate editing workflow, in which case you're good to go. You already transcoded all of your files to a loftier-quality codec before you lot started editing, so you can simply carry on with those same files for color-correction. That is also user-friendly because those files are good both for editing and for colour-correcting and VFX (see below).
If you lot are handing off the project to an external colorist or VFX person, then you can either requite them all of your high-quality footage (potentially annoying because of the size), or you tin can use the same consolidation tip that we used higher up. Handing off the consolidated projection tin help y'all move faster and save your colorist's time as well.
Some other advantage
In addition to the simplicity of the Direct Intermediate workflow (yous utilize just one prepare of files), you take one other advantage: going dorsum and forth between editing and color-correcting is simpler.
Imagine you've finished your proxy edit – you consolidate and transcode, transport it off to your colorist, and then decide that you demand to make some changes to the edit. Now yous've got go back to the proxies to make the edit and so re-consolidate and re-send the footage. The mechanics of that can go pretty messy. In a high-end post-production workflow, there is usually a "lock" on the edit so that the finishing processes can first. This means that (unless bad things happen) yous volition effort very difficult not go back and brand changes to the edit. But hey, bad things happen, so it's best to exist prepared.
And now we find some other good reason for a Direct Intermediate edit. If you lot are going to practice some of your color work and your editing work simultaneously, or at least are going to go dorsum and forth a couple times, then it can exist simpler to use i codec for both. This is especially convenient if you are doing your editing and finishing in the same software package (or set of packages, due east.k. Creative Cloud).

The Codec yous send to VFX
(back to the index)
If you're doing any VFX piece of work, then you're probably going to need to transport files to some other program (potentially another car, for some other creative person). If you lot're doing all of your VFX work in your editor (which is becoming more and more viable for elementary jobs), then you tin can skip this department. Just use the same codec equally yous used for your color correction.
For well-nigh of the states, withal, we need to fix a "round-trip" process that sends clips from the editor to the VFX software and so dorsum again when they're finished. This happens on a shot-by-shot ground, so you're not sending the entire sequence to VFX, similar you lot probably did for color grading. The question of when in the process you send your shots to VFX depends very much on the particular workflow.
Some people volition send to VFX after the edit is locked and colour-correction finished, but time pressure can force y'all to start sending off shots earlier then.
If you're editing in Premiere Pro and doing balmy VFX in Later Effects with Dynamic Link, so you can likewise skip this department. Dynamic Link automatically does the round-tripping for you. If you're doing a lot of VFX work, you may still want to apply the techniques in this department, because Dynamic Link tin be a little flake finicky with also many projects. Adobe is always working on those bugs, however, and so it's partly up to personal taste.
Get big or get home
In the VFX process, yous tend to utilize very loftier-finish (high bitrate) codecs for two primary reasons. The first is simply that VFX artists need all the information you tin give them in order to do their chore well. VFX artists are some of the pickiest people when it comes to codecs, and for skillful reason. Everyone wants high-quality images, only image issues tin can oft pose more of a trouble for VFX than information technology does for editing, color-correction, and final consign.
Many tasks in VFX work require very detailed assay of the image on a pixel-by-pixel level, which near editors never need to do. For instance, if y'all're doing a green-screen extraction, you want the edge betwixt your character and the greenscreen to be as make clean equally possible. Nosotros've all seen awful greenscreen shots where the edges of the character are all inclement or blurred out. These problems often arise because of image pinch artifacts that are invisible to the naked eye. iv:2:2 or 4:2:0 color subsampling, for instance, has well-nigh no visible impact on the image. The human heart cares mainly well-nigh dissimilarity and seldom notices depression color resolution, but the greenscreen extraction process relies primarily on color values. If the codec has thrown away a big portion of the colour values past using 4:2:0 blush subsampling, a practiced color key may be impossible.
Generation loss
The 2nd reason why you lot want to utilize high-end codecs is because of generation loss. In the VFX process, y'all will probably take to shrink your file multiple times. Y'all will compress the file in one case when you ship it to them. And then, if they need to laissez passer the file on between multiple specialists, they may compress that file ii or three times before they send it back. When a file is compressed multiple times, we call that multiple generation loss.
If you are using a depression-terminate codec, the epitome volition get progressively worse each time you lot re-compress it. One of the great things near the really high-quality codecs is that you can shrink them a couple times without losing much quality. While it's always better to avoid compressing a video multiple times, if you're using very high-quality codecs, you're ordinarily pretty fine.
Some high-finish VFX workflows will only use lossless pinch for this reason. The good news is that your VFX shots are usually only a few seconds per clip, which means your file sizes volition be pocket-sized even with high-stop codecs. Then go large! If you lot captured 4:4:four in the camera, and then definitely send 4:4:4 to VFX. Otherwise, I would pick a superlative-of-the-line iv:2:two codec (ProRes 422 HQ or DNxHQX).
And of course, you lot should e'er communicate beforehand with VFX virtually what codec to send. If you think they're making a bad choice, transport them this article 🙂

The Codec Yous Export
(back to the index)
Now you lot've finished the editing, the color, and the VFX – you're ready to export. You will usually do the final consign from the software that you used for colour-correction, using the codec that you used in the color-correction process.
If your client is in the media concern, they should know what codec they want, so you tin skip the balance of this department!
If your client is not a video expert, they may not know what they want, and so y'all need to make some decisions for them. Most of the time, your client is going to desire a video to upload to YouTube and/or other social media sites. You may be tempted to choose a codec that is good for streaming on the Internet. But y'all would be incorrect!
The reason why: these sites do non stream the same file that you upload to your viewers – they compress the file *again* earlier streaming it, and y'all accept absolutely no control over the settings that they use. This means that, if you upload a low-quality codec, and so nosotros take the scenario where we're taking a low-quality photo of a depression-quality photo that nosotros talked nigh. Bad! Avert!
Aim for all-time quality
Equally a general rule, if you desire the best quality issue, you lot should upload the best quality source. They're going to compress again anyway, so giving them more information work with can't hurt, right? If you lot have a fast enough connectedness, you lot could upload a ProRes 422. Some people have reported slightly (only slightly) ameliorate results when uploading ProRes instead of the recommended h.264.
If you are delivering a file to a client, for them to upload to Youtube, then I would non give them ProRes, since you don't know what kind of bandwidth they're going to have. Fortunately, these sites tend to publish recommended upload specs (but Google it). I personally will take whatever bitrate they recommend and multiple past about 1.5x to 2x.
Your client may likewise want a file that they can embed direct into their website (though I would dissuade them, if you can). Mostly speaking, you want a very heavily-compressed h.264. If you're curious what a good bitrate is, my reasoning is that, if anyone knows what the sweet-spot bitrate is, information technology'south YouTube. I periodically download a video from YouTube and check its bitrate, and employ that every bit a criterion.
Going small-scale
If the video is not public, they may likewise want a small file that they can electronic mail or link directly to their own clients so that they tin can download it. In these cases, it may exist appropriate to deliver more than than two separate files, especially if it'south a long video. The file they should upload to YouTube will be as well big to email conveniently. In this example, I will commonly down-res the file and shrink it very heavily. You also accept to be realistic and decide whether you lot remember that your client volition really sympathise the difference between the 2 files.
If I need to deliver more than one file, I volition usually telephone call one of them "HD" in the filename and the other one "small" or "not Hd" in the filename. If you attempt to describe the different codecs to them, I tin can almost guarantee they'll accept forgotten the deviation past side by side week, simply they'll probably remember what HD and "not Hd" means.

The Codec Yous Archive
(dorsum to the index)
You lot've delivered the file(southward) to your client, and then now you tin can sit back and relax… almost.
Equally any working professional in this industry knows, the day when you deliver the finished product to your client is often not the final time you impact a project. Sometimes a customer wants to become back and change something weeks subsequently, or they want a higher-quality codec, or maybe y'all want to add it to your personal reel. In any of these cases, yous may accept moved on to a different automobile or to unlike software, making information technology a headache to open the original project and re-export.
That's handy
This is where it comes in handy to take a great archive of the finished project in an extremely loftier-quality codec. If your client requested a very high-quality codec for delivery, then you're generally prepare. But keep a copy of that file, and you're good. If they need a delivery codec that's non tip-top quality, yet, it's e'er skilful to do your ain export with a codec that is lossless or as shut to lossless as you can afford, given the space it will have. I will mostly export to a very loftier-bitrate iv:4:iv codec – either DNxHD/Hour or ProRes.
Got questions?Comment away.
I actually read every comment. This commodity is a work in progress, and I'll be updating it with more explanations and examples based on your feedback. If you have some private feedback or questions, shoot me an email: david at frame dot io.
Want to write for the Frame.io Blog? Electronic mail me: blog at frame dot io.
Many thank you to Larry Jordan, Shane Ross, and Philip Hodgetts for their input on this article!
Source: https://blog.frame.io/2017/02/15/choose-the-right-codec/
Posted by: branhamfars1969.blogspot.com
0 Response to "Can You Upload Apple Prores 422 To Youtube"
Post a Comment